Acrylic Nail Application Guidelines
|
| |
Nail product
manufacturers spend a great deal of time in research,
development and testing prior to releasing a product. The type
and combination of chemicals in any given nail product line are
designed to work together as a complete unit in order to achieve
the best possible results. Every manufacturers line of products
have their own nuances and because of this, mixing products from
different lines may result in various forms of service
breakdown. For long-term wearability, always use complete
systems when applying artificial nail enhancements. Always
follow the manufacturers instructions and read and understand
the warning labels on all your products.
Application Procedure
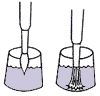
Pour a small amount of monomer into a dappen dish -- use
only what you will need for the particular service you
are performing. Totally immerse and 'swish' your brush
in the monomer to thoroughly wet the hairs and to remove
any trapped air that may result in bubbles in the
finished product. Air bubbles compromise the strength
of the product and can lead to service breakdown.
|
 |
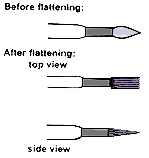
As you remove the brush
from the dish, flatten hairs on both sides to shape the
brush for sculpting and to drain excess liquid from the
brush. Now you are ready for sculpting.
|
 |
More
monomer = a larger bead, less monomer = a smaller bead.
Dip the brush into the monomer according to the desired
bead size. For a small bead, slide the flattened brush
down the side of the dish and submerge only the tips of
the flags (the darkest hairs) into the monomer. For a
larger bead, moisten the entire flag area of the brush.
|
 |
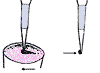
Draw a line in the powder to the depth of the liquid
line on your brush. The longer the line, the bigger the
bead. Allow the monomer to surround the polymer
particles. The bead should be medium in size and a
medium-wet consistency. A medium-wet mix ratio will not
immediately 'melt' down, it will have a slight 'textured
glass' appearance, and maintain its shape when placed on
the nail, tip or form.
|
 |
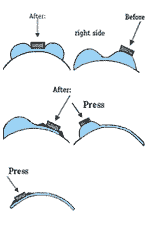
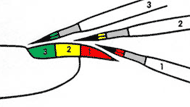
Place the bead at the smile line and in the center of
the natural nail. Press the bead with the flags of the
brush to flatten and separate the bead, then stroke to
the extension edge. Press either side of center to
flatten the bead and stroke to the extension edge, being
sure that the level of product is evenly distributed.
This section will be higher at the smile line (upper
arch) and tapered to all edges.
|
 |
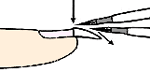
As you
smooth with the brush from smile to extension edge, it
is important to 'follow-through- with the stroke in a
downward motion.
|
 |
With the entire section
1 covered from side to side with product, the remaining
2-2 1/2 minutes of working time can be spent on
perfecting the smile line for symmetry.
|
 |
Perfect the line when
the product is very wet. Use a fluid motion to actually
draw in the smile. Use baby presses to perfect
the line and to ease the product further into the
corners of the smile. Use 'prep' on a dedicated prep
brush to clean up the smile line on the nail plate
if needed.
|
 |
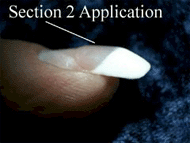
Pick up a medium size, medium-wet consistency bead
(pink, clear or natural) and place on the nail surface
just behind but still touching your previous section.
Press the bead to flatten and stroke to smooth and blend
with section 1. Continue in this manner until the
entire section is blended and smooth.
|
 |
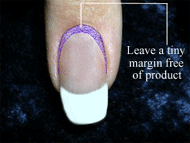
Pick up a small, medium-wet consistency bead and apply
to section 3 in the same manner. Be sure this section
tapers into the nail plate to avoid a ridge of product
at the cuticle line. Leave a tiny margin all around the
cuticle and sidewall line free of product. This will
allow the product to properly shrink when cured
(polymerized) and create an air-tight seal to the nail
plate.
|
 |
Pressing and smoothing will assure total product
control, eliminate bubbles in the product, allow for
complete contact of the product to the natural nail
plate, and eliminate excessive filing. Work with the
brush flat, and keep the flattened surface parallel to
the section you are working on. This means that the
angle of the brush will change with each section.
|
 |
|
|
Finishing
Using a
180 or 240-grit soft file, shape the free edge and
sidewalls to the desired form. Smooth the surface of
section 1, perfect the 'C' curve and taper to a thin
edge. Perfect the upper arch of section 2 and blend
smoothly with section 1. Blend cuticle area flush to the
natural nail, but do not over-file the natural nail.
Perfect sidewalls to a thin edge and blend with section
2. Remove all dust filings. Apply a small amount of
cuticle oil to all 10 nails. Massage into the cuticles
and the overlay. With a finely padded buffer, buff the
oil into the surface of the overlay to remove scratches.
Buff to a high gloss shine with a 3-way buffer: black
side, white side, then the gray side. Ask the client to
wash her hands to remove all traces of oil and buffing
dusts.
|
You may skip the 2nd last step if you prefer to use an acrylic
sealer rather than buffing to a shine. Apply a polish if
needed.
Always book a
2-week maintenance appointment prior to the client leaving.
Regularly scheduled maintenance appointments prevent service
breakdown and needless or costly repairs.
Discard or
sanitize files, dry and store them in a sealed container with
the clients name, address, phone number, profile card and any
other special instructions for their next visit.
Special
Notes
-
Never touch
your brush to the clients prepared nail plate or to the skin.
Doing so may result in overexposure and allergic reaction
from repeated and prolonged contact to the chemicals.
-
Never apply
product that is too wet. Too wet a mixture will not properly
polymerize and the excess monomer will be absorbed into the
nail plate which may cause an allergic reaction that could
result in nail plate separation.
-
Never
over-file the natural nail plate as this practice will remove
too many vital nail plate layers.
-
Heavy grit
files, heavy-handed filing or high-speed drills can heat the
nail bed in excess of 150° F, resulting in a burn to the nail
bed.
-
Never smoke,
eat or drink at the nail table to prevent cross-contamination
between your food and the products. Smoke will deposit a
layer of nicotine (oil) on the nail plate which may cause
lifting. Your products are flammable, so keep them away from
heat sources and sparks or flame.
-
Proper
preparation and application will prevent service breakdown
problems.
-
Work in a
well ventilated area. Proper ventilation will remove airborne
dusts and vapors from the building. Air conditioning only
circulates the existing air in a room or space.
-
Wear
protective clothing to prevent dusts from settling on your
skin.
-
Wear a
protective mask when filing to prevent inhalation of acrylic
dust filings, and change it often.
-
Take frequent
breaks during the day to prevent the possibility of repetitive
stress injuries.
The application
instructions are the same for a natural nail overlay and for an
overlay on an already applied and prepared tip.
Sculpting
on a Form
Sculpting on a
form requires a different technique in Section 1. When working
on a form, Section 1 is sculpted on a slick 'cool' surface.
Since there is no body heat coming through the form, it will
slow down evaporation and set time. The product will seem
wetter and take more time to get to a gel-like consistency where
it can be pressed and smoothed with confidence. You must use
delicate pressure when working with the product in this initial
stage.
Section 1
Sculpting
Place a medium size
medium-wet bead onto the form just in front of the
natural free edge.
|

|
Press the center of the
bead to flatten and spread.
|

|
Press the bead to the
right sidewall.
|

|
Press the bead to the
left sidewall.
|

|
Use the side of your
brush to perfect the sideline and to create the lower
arch. Perform this same procedure on the other side.
|

|
Push the corners in at
an angle to narrow the extension edge and/or to create
an oval or almond shape.
|
 
|
Using the tip of the
brush to clean up the extension outline to a crisp line.
|

|
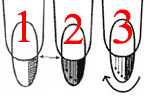
Follow the '3-step'
spread & smile technique to perfect section 1 dimensions
and to 'tuck' the corners to create a deep smile.
|
 |
Complete the
application in Sections 2 & 3 by following the procedures for
these sections in the Overlay instructions at the top of this
page.
|
|
|